How to Lock Cells in Google Sheets
In this article, you will learn how to protect sheets in Google Sheets.
This function is helpful in protecting content (e.g., complicated formulas, raw data resources, a series of calculations) in Google Sheets by preventing intentional edits and unintentional changes by collaborators.
How to Protect cells in Google Sheets
- Move to a worksheet on which you protect a range of cells and select the field.
- Go to “Data” and “Protect sheets and ranges”.
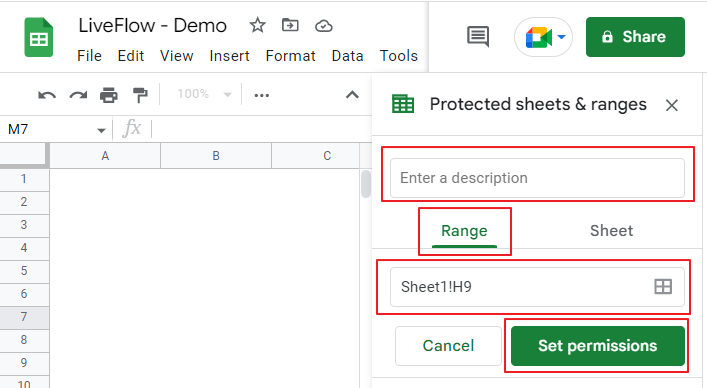
- In the pop-up menu on the right side, go to “Range”.
- Enter a description of the range (if you want) and confirm the correct area is selected
- Click “Set Permission”.
- Choose one of the options* shown in a pop-up.
*If you are OK for others to edit data in the selected range, but you want to warn them before their upcoming edits, choose “Show a warning when editing this range”. If you don’t allow any edits in the selected area, click “Restrict who can edit this range” and appoint only yourself as an eligible editor. At this point, if you choose “Custom”, you can add eligible editors.


How to protect sheets in Googles Sheets
You can lock sheets almost the same way as you protect a range of cells.
- Move to a worksheet on which you protect a range of cells and select the field.
- Go to “Data” and “Protect sheets and ranges”.
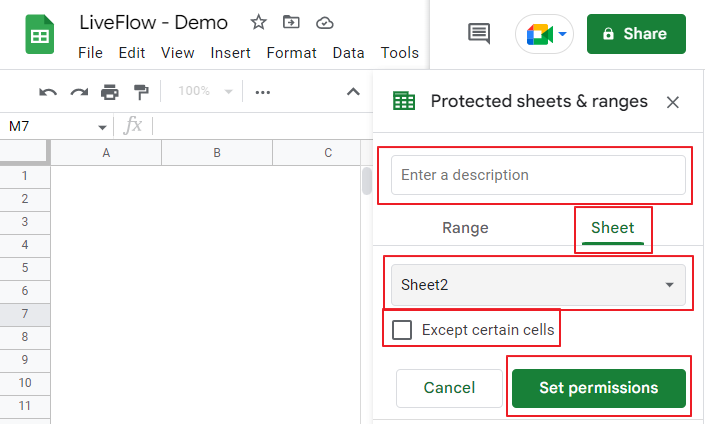
- In the pop-up menu on the right side, go to “Sheet”.
- Choose a sheet you want to lock from the drop-down list
- Check the box next to “Except certain cells” and enter a range if you're going to leave part of the sheet editable
- Click “Set Permission”.
- Choose one of the options* shown in a pop-up.
*If you are OK for others to edit in the selected range, but you want to warn them before their edits, choose “Show a warning when editing this range”. If you don’t allow any edits in the selected area, click “Restrict who can edit this range” and appoint only yourself as an eligible editor. At this point, if you choose “Custom”, you can add eligible editors.

When are locking cells and sheets beneficial?
Here is an example where cell protection is beneficial for an owner of a sheet. Imagine there is an accountant who prepares a financial report for a client in Google Sheets and shares it with the client to ask for their input.
However, he doesn’t want his client to edit a particular part of the spreadsheet. In this case, the accountant can achieve the ideal setting by locking specific cells or entire sheets except for certain cells.

