How to Select Multiple Rows in Excel
In this article, you will learn how to select more than one adjacent and non-adjacent rows in Excel.
Why do many rows need to be selected in Excel?
There can be several reasons to select multiple rows in Excel, a few of them are mentioned below:
Formatting multiple rows: If you want to format several rows in the same way, such as changing the font color, cell border, or alignment, selecting all the rows at once can be a more efficient way to format them in one go.
Deleting or moving multiple rows: If you need to delete or move several rows of data, selecting them all at once and deleting or moving them together can make the process quicker and easier.
Copying and pasting data: If you need to copy and paste data from one set of rows to another or to another Excel workbook, selecting all the rows you want to copy and then pasting them into the destination cells together can save you time and ensure accuracy.
Overall, selecting multiple rows in an Excel spreadsheet can help you to perform actions more efficiently, especially when working with large amounts of data in an Excel workbook.
How to select multiple rows in Excel?
Case 1: Selecting multiple adjacent rows in Excel
To select consecutive rows in a spreadsheet, follow either of the three simple methods described below:
Method 1:
Step 1: Select a row by left-clicking on the relevant row header
Step 2: Keeping the left button on the mouse pressed down, drag the mouse cursor on the row header upwards or downwards depending on which rows you wish to select
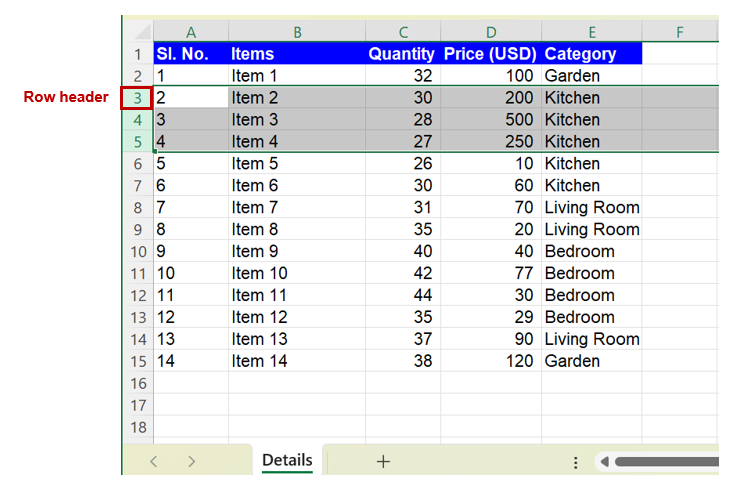
For example: To select rows 3, 4 and 5 - > select row 3 by left-clicking on the row header -> keeping the left button on the mouse pressed, drag the cursor downwards until rows 4 and 5 are selected as shown in the image below.

Method 2: Alternatively, you can also use the “SHIFT” key to select more than one adjacent rows in Excel. Select the first row in the sequence by clicking on the row header -> press and hold down the “SHIFT” key -> select the last row in the sequence -> all rows in between the first and last row will be selected.
Method 3: Furthermore, you can also select multiple adjacent rows using the keyboard as below:
Step 1: Select any cell in the first row you wish to select
Step 2: Press and hold the “SHIFT” and the “SPACEBAR” keys
This will select the entire row.
Step 3: Then while pressing and holding the “SHIFT” key, use the “Up Arrow” or “Down Arrow” keys to select multiple consecutive rows to the top or bottom of the row selected in Step 1
Case 2: Selecting non-adjacent rows in Excel
To select more than one row that are non-adjacent (meaning not placed in sequence one below the other) in Excel, follow the below steps:
Step 1: Click on the first row you want to select by clicking on the row header
Step 2: Press and hold down the “CTRL” (“Command” in case of Mac) key on your keyboard and then click on the additional row headers you want to select
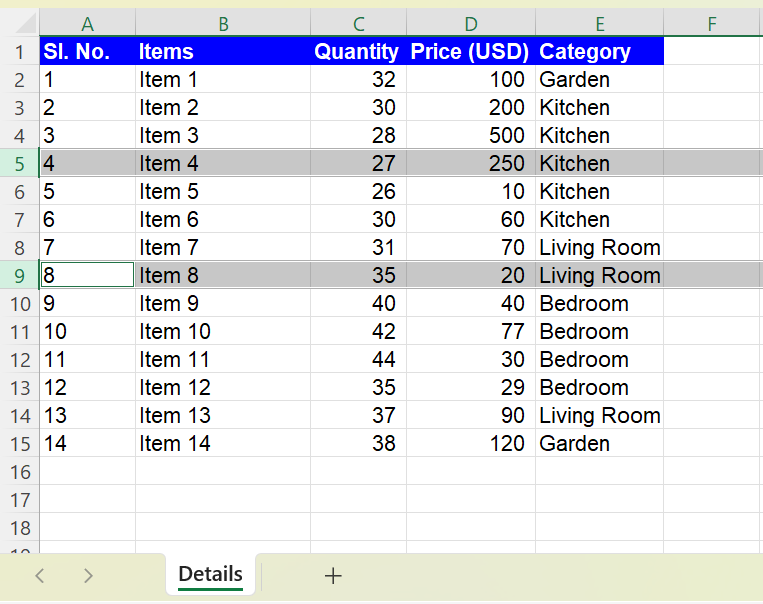
For example: To select rows 5 and 9 -> select row 5 by clicking on the row header -> then press and hold down the “CTRL” (“Command” in case of Mac) key -> select row 9 by clicking on the row header -> row 5 and 9 will be selected as shown in the image below.

Analyze your live financial data in a snap in Google Sheets
Are you learning this formula to visualize financial data, build a financial model, or conduct financial analysis? In that case, LiveFlow may help you automate manual workflows, update numbers in real-time, and save time. You can access various financial templates on our website, from the simple Income Statement to Multi-Currency Consolidated Financial Statement. Are you interested in this product but are an Excel user? That’s not a problem at all. You can connect Google Sheets to Excel quickly.
To learn more about LiveFlow, book a demo.

You can learn about other Excel and Google Sheets formulas and tips that are not mentioned here on this page: LiveFlow‘s How to Guides

